[Mastering NodeJS - PACKT] Từ trang 200 đến 229

Đây là nội dung được trích xuất từ "Mastering NodeJS - PACKT" (Tác giả: Unknown Author). Bài được extract tự động bởi Aha! Mind Interpreter.
"It is a very sad thing that nowadays there is so little useless information."
—Oscar Wilde
The importance of I/O efficiency is not lost on those witnessing the rapidly increasing volume of data being produced within a growing number of applications. User-generated content (blogs, videos, tweets, posts) is becoming the premier type of internet content, and this trend has moved in tandem with the rise of social software, where mapping the intersections between content generates an exponential rise in yet another level of data.
A number of data silos, such as Google, Facebook, and hundreds of others, expose their data to the public through an API, often for free. These networks each gather astounding volumes of content, opinions, relationships, and so forth from their users, data further augmented by market research and various types of traffic and usage analysis. Most of these APIs are two-way, gathering and storing data uploaded by their members as well as serving that data.
Node has arrived during this period of data expansion. In this chapter we will investigate how Node addresses this need for sorting, merging, searching, and otherwise manipulating large amounts of data. Fine-tuning your software, so that it can process large amounts of data safely and inexpensively, is critical when building fast and scalable network applications.
We will deal with specific scaling issues in the next chapter. In this chapter we will study some best practices when designing systems where multiple Node processes work together on large volumes of data.
Utilizing Multiple Processes
As part of that discussion, we will be investigating strategies for parallelism when building data-heavy applications, focused on how to take advantage of multiple CPU environments, use multiple workers, and leverage the OS itself to achieve the efficiency of parallelism. The process of assembling applications out of these contained and efficient processing units will be demonstrated by example.
As noted in Chapter 5, Managing Many Simultaneous Client Connections, concurrency is not the same as parallelism. The goal of concurrency is good structure for programs, where modeling the complexities inherent in juggling multiple simultaneous processes is simplified. The goal of parallelism is to increase application performance by sharing parts of a task or computation across many workers. It is useful to recall Clinger's vision of "…dozens, hundreds or even thousands of independent microprocessors, each with its own local memory and communications processor, communicating via a high-performance communications network."
We've already discussed how Node helps us reason about non-deterministic control flow. Let's also recall how Node's designers follow the Rule Of Modularity, which encourages us to write simple parts connected by clean interfaces. This rule leads to a preference for simple networked processes communicating with each other using a common protocol. An associated rule is the Rule of Simplicity, stated as follows:
Developers should design for simplicity by looking for ways to break up program systems into small, straightforward cooperating pieces. This rule aims to discourage developers' affection for writing "intricate and beautiful complexities" that are in reality bug prone programs.
— http://en.wikipedia.org/wiki/Unix_philosophy
It is good to keep this rule in mind as we proceed through this chapter. To tame expanding data volume we can build enormous, complex, and powerful monoliths in the hope that they will remain big and powerful enough. Alternatively, we can build small and useful units of processing that can be combined into a single processing team of any size, not unlike the way that supercomputers can be built out of many thousands or millions of cheap commodity processors.
[ 184 ]
Chapter 7
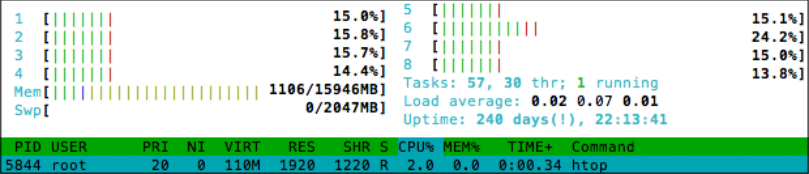
A process viewer will be useful while working through this chapter. A good one for Unix systems is htop, which can be downloaded from http://htop.sourceforge. net/. This tool provides, among other things, a view into CPU and memory usage; here we see how load is spread across all eight cores:
Node's single-threaded model
Taken in its entirety, the Node environment usefully demonstrates both the efficiency of multithreaded parallelism and an expressive syntax amenable to applications featuring high concurrency. Using Node does not constrain the developer, the developer's access to system resources, or the types of applications the developer might like to build.
Nevertheless, a surprising number of persistent criticisms of Node are based on this misunderstanding. As we'll see, the belief that Node is not multithreaded and is, therefore, slow, or not ready for prime time, simply misses the point. JavaScript is single-threaded; the Node stack is not. JavaScript represents the language used to coordinate the execution of several multithreaded C++ processes, even the bespoke C++ add-ons created by you, the developer. Node provides JavaScript, run through V8, primarily as a tool for modeling concurrency. That, additionally, one can write an entire application using just JavaScript is simply another benefit of the platform. You are never stuck with JavaScript—you may write the bulk of your application in C++ if that is your choice.
In this chapter we will attempt to dismantle these misunderstandings, clearing the way for optimistic development with Node. In particular, we will study techniques for spreading effort across cores, processes, and threads. For now, this section will attempt to clarify how much a single thread is capable of (hint: it's usually all you need).
[ 185 ]
 Utilizing Multiple Processes
The benefits of single-threaded programming
You will be hard-pressed to find any significant number of professional software engineers working on enterprise-grade software willing to deny that multithreaded software development is painful. However, why is it so hard to do well?
It is not that multithreaded programming is difficult per se—the difficultly lies in the complexity of thread synchronization. It is very difficult to build high concurrency using the thread model, especially models in which the state is shared. Anticipating every way that an action taken in one thread might affect all the others is nearly impossible once an application grows beyond the most basic of shapes. Entanglements and collisions multiply rapidly, sometimes corrupting shared memory, sometimes creating bugs nearly impossible to track down.
Node's designers chose to recognize the speed and parallelization advantages of threads without demanding that developers did the same. In particular, Node's designers wanted to save developers from managing the difficulties that accompany threaded systems:
-
Shared memory and the locking behavior leads to systems that are very difficult to reason about as they grow in complexity.
-
Communication between tasks requires the implementation of a wide range of synchronization primitives, such as mutexes and semaphores, condition variables and so forth. An already challenging environment requires highly complex tools, expanding the level of expertise necessary to complete even relatively simple systems.
-
Race conditions and deadlocks are common pitfalls in these sorts of systems. Contemporaneous read and write operations within a shared program space lead to problems of sequencing, where two threads may be in an unpredictable "race" for the right to influence a state, event, or other key system characteristic.
-
Because maintaining dependable boundaries between threads and their states is so difficult, ensuring that a library (what for Node would be a "module") is thread-safe consumes a great deal of developer time. Can I know that this library will not destroy some part of my application? Guaranteeing thread safety requires great diligence on the part of a library's developer and these guarantees may be conditional: for example, a library may be thread-safe when reading—but not when writing.
[ 186 ]
Chapter 7
The primary argument for single-threading is that control flow is difficult in concurrent environments, and especially so when memory access or code execution order is unpredictable:
-
Instead of concerning themselves with arbitrary locking and other collisions, developers can focus on constructing execution chains whose ordering is predictable.
-
Because parallelization is accomplished through the use of multiple processes, each with an individual and distinct memory space, communication between processes remains uncomplicated—via the Rule of Simplicity we achieve not only simple and bug-free components, but easier interoperability as well.
-
Because state is not (arbitrarily) shared between individual Node processes, a single process is automatically protected from surprise visits from other processes bent on memory reallocation or resource monopolization. Communication is through clear channels using basic protocols, all of which makes it very hard to write programs that make unpredictable changes across processes.
-
Thread-safety is one less concern for developers to waste time worrying about. Because single-threaded concurrency obviates the collisions present in multithreaded concurrency, development can proceed more quickly, on surer ground.
[ 187 ]
Utilizing Multiple Processes
A single thread efficiently managed by an event loop brings stability, maintainability, readability, and resilience to Node programs. The big news is that Node continues to deliver the speed and power of multithreading to its developers—the brilliance of Node's design makes such power transparent, reflecting one part of Node's stated aim of bringing the most power to the most people with the least difficulty.
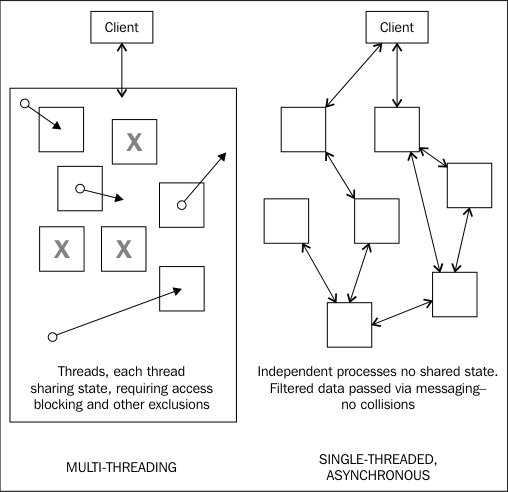
In the preceding diagram, the differences between two single-threaded models and a multithreaded model are shown.
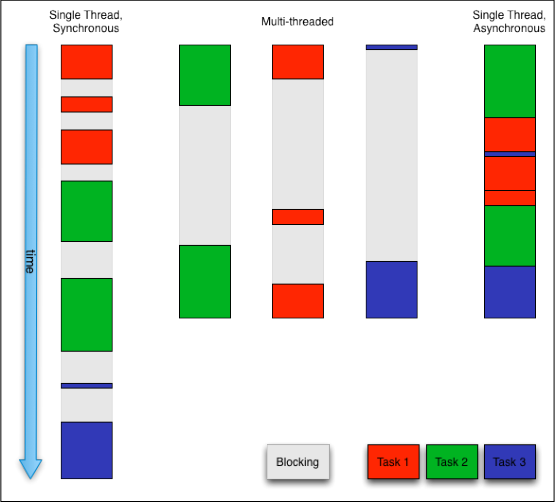
There is no escape from blocking operations—reading from a file, for example, will always take some time. A single-threaded synchronous model forces each task to wait for others to finish prior to starting, consuming more time. Several tasks can be started in parallel using threads, even at different times, where total execution time is no longer than that taken by the longest running thread. When using threads, the developer becomes responsible for synchronizing the activity of each individual thread, using locks or other scheduling tools. This can become very complex when the number of threads increases, and in this complexity lives very subtle and hard-to-find bugs.
[ 188 ]
 Chapter 7
Rather than having the developer struggle with this complexity, Node itself manages I/O threads. You need not micromanage I/O threading; one simply designs an application to establish data availability points (callbacks) and the instructions to be executed once the said data is available. Threads provide the same efficiency under the hood, yet their management is exposed to the developer through an easily comprehensible interface.
Multithreading is already native and transparent
Node's I/O thread pool executes within the OS scope, and its work is distributed across cores (just as any other job scheduled by the OS would be similarly distributed). When you are running Node, you are already taking advantage of its multithreaded execution.
In the upcoming discussion of child processes and the Cluster module, we will see this style of parallelism—of multiple parallel processes—in action. We will see how Node is not denied the full power of an OS.
As we saw earlier, when discussing Node's core architecture, the V8 thread in which one executes JavaScript programs is bound to libuv, which functions as the main, system-level, I/O event dispatcher. In this capacity, libuv handles the timers, filesystem calls, network calls, and other I/O operations requested by the relevant JavaScript process or module commands, such as fs.readFile, http.createServer, and so on. Therefore, the main V8 event loop is best understood as a control-flow programming interface, supported and powered by the highly-efficient, multithreaded, system delegate libuv.
Burt Belder, one of Node's core contributors, is also one of the core contributors to libuv. In fact, Node's development has provoked a simultaneous increase in libuv development, a feedback loop that has only improved the speed and stability of both projects. It has merged and replaced the libeo and libev libraries that formed the original core of Node's stack.
Consider another of Raymond's rules, the Rule of Separation : "Separate policy from mechanism; separate interfaces from engines". The engine that powers Node's asynchronous, event-driven style of programming is libuv; the interface to that engine is V8's JavaScript runtime. Continuing with Raymond:
One way to effect that separation is, for example, to write your application as a library of C service routines that are driven by an embedded scripting language, with the application flow of control written in the scripting language rather than C.
[ 189 ]
Utilizing Multiple Processes
The ability to orchestrate hyper-efficient parallel OS processes within the abstraction of a single predictable thread exists by design, not as a concession. It concludes a pragmatic analysis of how the application development process can be improved, and it is certainly not a limitation on what is possible.
A detailed unpacking of libuv can be found at http://nikhilm. github.io/uvbook/. Burt Belder also gives an in-depth talk on how libuv works under the hood at http://www.youtube. com/watch?v=nGn60vDSxQ4.
Creating child processes
Software development is no longer the realm of monolithic programs. Applications running on networks cannot forego interoperability. Modern applications are distributed and decoupled. We now build applications that connect users with resources distributed across the Internet. Many users are accessing shared resources simultaneously. A complex system is easier to understand if the whole is understood as a collection of interfaces to programs that solve one or a few clearly defined, related problems. In such a system it is expected (and desirable) that processes do not sit idle.
An early criticism of Node was that it did not have multicore awareness. That is, if a Node server were running on a machine with several cores, it would not be able to take advantage of this extra horsepower. Within this seemingly reasonable criticism hid an unjustified bias based on a straw man: a program that is unable to explicitly allocate memory and execution "threads" in order to implement parallelization cannot handle enterprise-grade problems.
This criticism is a persistent one. It is also not true.
While a single Node process runs on a single core, any number of Node processes can be "spun up" through use of the child_process module. Basic usage of this module is straightforward: we fetch a ChildProcess object, and listen for data events. This example will call the Unix command ls, listing the current directory:
var spawn = require('child_process').spawn; var ls = spawn('ls', ['-lh', '.']); ls.stdout.on('readable', function() { var d = this.read(); d && console.log(d.toString()); }); ls.on('close', function(code) { console.log('child process exited with code ' + code); });
[ 190 ]
Chapter 7
Here, we spawn the ls process (list directory), and read from the resulting readable Stream, receiving something like:
-rw-r--r-- 1 root root 43 Jul 9 19:44 index.html
-rw-rw-r-- 1 root root 278 Jul 15 16:36 child_example.js
-rw-r--r-- 1 root root 1.2K Jul 14 19:08 server.js
child process exited with code 0
Any number of child processes can be spawned in this way. It is important to note here that when a child process is spawned, or otherwise created, the OS itself assigns the responsibility for that process to a given CPU. Node is not responsible for how an OS allocates resources. The upshot is that on a machine with eight cores it is likely that spawning eight processes will result in each being allocated to independent processors. In other words, child processes are automatically spread by the OS across CPUs, putting the lie to claims that Node cannot take full advantage of multicore environments.
Each new Node process (child) is allocated 10 MB of memory, and represents a new V8 instance that will take at least 30 milliseconds to start up. While it is unlikely that you will be spawning many thousands of these processes, understanding how to query and set OS limits on user-created processes is beneficial. htop or top will report the number of processes currently running, or you can use ps aux | wc –l from the command line. The Unix command ulimit (http://ss64.com/ bash/ulimit.html) provides important information on user limits on an OS. Passing ulimit, the –u argument will show the maximum number of user processes that can be spawned. Changing the limit is accomplished by passing it as an argument: ulimit –u 8192.
The child_process module represents a class exposing four main methods: spawn, fork, exec, and execFile. These methods return a ChildProcess object that extends EventEmitter, exposing an interface to child events and a few functions that are helpful to managing child processes. We'll take a look at its main methods, and follow up with a discussion of the common ChildProcess interface.
[ 191 ]
Utilizing Multiple Processes
Spawning processes
This powerful command allows a Node program to start and interact with processes spawned via system commands. In the preceding example, we used spawn to call a native OS process, ls, passing that command the lh and . arguments. In this way, any process can be started just as one might start it via a command line. The method takes three arguments:
-
command : A command to be executed by the OS shell
-
arguments (optional): These are command-line arguments, sent as an array
-
options : An optional map of settings for spawn
The options for spawn allow its behavior to be carefully customized:
-
cwd (String): By default, the command will understand its current working directory to be the same as that of the Node process calling spawn. Change that setting using this directive.
-
env (Object): This is used to pass environment variables to a child process. For instance, consider spawning a child with an environment object such as the following:
{ name : "Sandro", role : "admin" }
The child process environment will have access to these values.
-
detached (Boolean): When a parent spawns a child, both processes form a group, and the parent is normally the leader of that group. To make a child the group leader, use detached. This will allow the child to continue running even after the parent exits. This is because the parent will wait for the child to exit by default. You can call child.unref() to tell the parent's event loop that it should not count the child reference, and exit if no other work exists.
-
uid (Number): Set the uid (user identity) directive for the child process, in terms of standard system permissions, such as a UID that has execute privileges on the child process.
-
gid (Number): Set the gid (group identity) directive for the child process, in terms of standard system permissions, such as a GID that has execute privileges on the child process.
[ 192 ]
Chapter 7
- stdio (String or Array): Child processes have file descriptors, the first three being the standard I/O descriptors process.stdin, process.stdout and process.stderr, in order (fds = 0,1,2). This directive allows those descriptors to be redefined, inherited, and so forth.
Consider the output of the following child process program:
process.stdout.write(new Buffer("Hello!"));
Here, a parent would listen on child.stdout. If instead we want a child to inherit its parent's stdio, such that when the child writes to process.stdout what is emitted is piped through to the parent's process.stdout, we would pass the relevant parent file descriptors to the child, overriding its own:
spawn("node", ['./reader.js', './afile.txt'], { stdio: [process.stdin, process.stdout, process.stderr] });
In this case, the child's output would pipe straight through to the parent's standard output channel. Also, see fork, below, for more information on this kind of pattern.
Each of the three (or more) file descriptors can take one of six values:
° ° pipe: This creates a pipe between the child and the parent. As the first three child file descriptors are already exposed to the parent (child.stdin, child.stdout, and child.stderr) this is only necessary in more complex child implementations.
° ° ipc: This creates an IPC channel for passing messages between a child and parent. A child process may have a maximum of one IPC file descriptor. Once this connection is established, the parent may communicate with the child via child.send. If the child sends JSON messages through this file descriptor, those emissions can be caught by using child.on("message"). If running a Node program as a child, it is likely a better choice to use ChildProcess.fork, which has this messaging channel built in.
° ° ignore: The file descriptors 0-2 will have /dev/null attached to them. For others, the referenced file descriptor will not be set on the child.
° ° A stream object : This allows the parent to share a stream with the child. For demonstration purposes, given a child that will write the same content to any provided WritableStream, we could do something like this:
var writer = fs.createWriteStream("./a.out"); writer.on('open', function() {
[ 193 ]
Utilizing Multiple Processes
var cp = spawn("node", ['./reader.js'], { stdio: [null, writer, null] }); });
The child will now fetch its content and pipe it to whichever output stream it has been sent:
fs.createReadStream('cached.data').pipe(process.stdout);
° ° An integer : A file descriptor id.
° ° null and undefined: These are the default values. For file descriptors 0-2 (stdin, stdout, and stderr) a pipe is created. Others default to ignore.
In addition to passing stdio settings as an array, certain common groupings can be implemented by passing a shortcut string value:
-
'ignore' = ['ignore', 'ignore', 'ignore']
-
'pipe' = ['pipe', 'pipe', 'pipe']
-
'inherit' = [process.stdin, process.stdout, process.stderr] or [0,1,2]
We have shown some examples of using spawn to run Node programs as child processes. While this is a perfectly valid usage (and a good way to try out the API options), spawn is primarily for running system commands. See the discussion of fork, below, for more information on running Node processes as children.
It should be noted that the ability to spawn any system process means that one can use Node to run other application environments installed on the OS. If one had the popular PHP language installed, the following would be possible:
var spawn = require('child_process').spawn;
var php = spawn("php", ['-r', 'print "Hello from PHP!";']);
php.stdout.on('readable', function() { var d; while(d = this.read()) { console.log(d.toString()); } });
// Hello from PHP!
[ 194 ]
Chapter 7
Running a more interesting, larger program would be just as easy.
Apart from the ease with which one might run Java or Ruby or other programs through Node using this technique, asynchronously, we also have here a good answer to a persistent criticism of Node: JavaScript is not as fast as other languages for crunching numbers, or doing other CPU-heavy tasks. This is true, in the sense that Node is primarily optimized for I/O efficiency and helping with the management of high-concurrency applications, and JavaScript is an interpreted language without a strong focus on heavy computation.
However, using spawn, one can very easily pass off massive computations and long-running routines on analytics engines or calculation engines to separate processes in other environments. Node's simple event loop will be sure to notify the main application when those operations are done, seamlessly integrating the resultant data. In the meantime, the main application is free to keep serving clients.
Forking processes
Like spawn, fork starts a child process, but is designed for running Node programs with the added benefit of having a communication channel built in. Rather than passing a system command to fork as its first argument, one passes the path to a Node program. As with spawn, command-line options can be sent as a second argument, accessible via process.argv in the forked child process.
An optional options object can be passed as its third argument, with the following parameters:
-
cwd (String): By default, the command will understand its current working directory to be the same as that of the Node process calling fork. Change that setting using this directive.
-
env (Object): This is used to pass environment variables to a child process. See spawn.
-
encoding (String): This sets the encoding of the communication channel.
-
execPath (String): This is the executable used to create the child process.
-
silent (Boolean): By default, a forked child will have its stdio associated with the parent's (child.stdout is identical to parent.stdout, for example). Setting this option to true disables this behavior.
An important difference between fork and spawn is that the former's child process does not automatically exit when it is finished. Such a child must explicitly exit when it is done, easily accomplished via process.exit().
[ 195 ]
Utilizing Multiple Processes
In the following example, we create a child that emits an incrementing number every tenth of a second, which its parent then dumps to the system console. First, the child program:
var cnt = 0;
setInterval(function() { process.stdout.write(" -> " + cnt++); }, 100);
Again, this will simply write a steadily increasing number. Remembering that with fork a child will inherit the stdio of its parent, we only need create the child in order to get output in a terminal running the parent process:
var fork = require('child_process').fork; fork('./emitter.js');
// -> 0 -> 1 -> 2 -> 3 -> 4 -> 5 -> 6 -> 7 -> 8 -> 9 -> 10 ...
The silent option can be demonstrated here. The following turns off any output to the terminal:
fork('./emitter.js', [], { silent: true });
Creating multiple, parallel processes is easy. Let's multiply the number of children created:
fork('./emitter.js'); fork('./emitter.js'); fork('./emitter.js');
// 0 -> 0 -> 0 -> 1 -> 1 -> 1 -> 2 -> 2 -> 2 -> 3 -> 3 -> 3 -> 4 ...
It should be clear at this point that by using fork we are creating many parallel execution contexts, spread across all machine cores.
This is straightforward enough, but the built-in communication channel fork provides makes communicating with forked children even easier, and cleaner. Consider the following:
- Parent
var fork = require('child_process').fork; var cp = fork('./child.js'); cp.on('message', function(msgobj) { console.log('Parent got message:', msgobj.text); });
[ 196 ]
Chapter 7
cp.send({ text: "I love you" });
- Child
process.on('message', function(msgobj) { console.log('Child got message:', msgobj.text); process.send({ text: msgobj.text + ' too' }); });
By executing the parent script, we will see the following in our console:
Child got message: I love you
Parent got message: I love you too
Buffering process output
In cases where the complete buffered output of a child process is sufficient, with no need to manage data through events, child_process offers the exec method. The method takes three arguments:
-
command : A command-line string. Unlike spawn and fork, which pass arguments to a command via an array, this first argument accepts a full command string, such as ps aux | grep node.
-
options : This is an optional argument.
° ° cwd (String): This sets the working directory for the command process.
° ° env (Object): This is a map of key-value pairs that will be exposed to the child process.
° ° encoding (String): This is the encoding of the child's data stream. The default value is 'utf8'.
° ° timeout (Number): This specifies the milliseconds to wait for the process to complete, at which point the child process will be sent the killSignal.maxBuffer value.
° ° killSignal.maxBuffer (Number): This is the maximum number of bytes allowed on stdout or stderr. When this number is exceeded, the process is killed. This default is 200 KB.
[ 197 ]
Utilizing Multiple Processes
° ° killSignal (String): The child process receives this signal after a timeout. This default is SIGTERM.
- callback : This receives three arguments: an Error object, if any; stdout (a Buffer object containing the result); stderr (a Buffer object containing error data, if any). If the process was killed, Error.signal will contain the kill signal.
When you want the buffering behavior of exec but are targeting a Node file, use execFile. Importantly, execFile does not spawn a new subshell, which makes it slightly less expensive to run.
Communicating with your child
All instances of the ChildProcess object extend EventEmitter, exposing events useful for managing child data connections. Additionally, ChildProcess objects expose some useful methods for interacting with children directly. Let's go through those now, beginning with attributes and methods:
-
child.connected: When a child is disconnected from its parent via child.disconnect(), this flag will be set to false.
-
child.stdin: This is a WritableStream corresponding to the child's standard in.
-
child.stdout: This is a ReadableStream corresponding to the child's standard out.
-
child.stderr: This is a ReadableStream corresponding to the child's standard error.
-
child.pid: This is an integer representing the process ID (PID) assigned to the child process.
-
child.kill: This tries to terminate a child process, sending it an optional signal. If no signal is specified, the default is SIGTERM (for more about signals, see http://unixhelp.ed.ac.uk/CGI/man-cgi?signal+7). While the method name sounds terminal, it is not guaranteed to kill a process—it only sends a signal to a process. Dangerously, if kill is attempted on a process that has already exited, it is possible that another process that has been newly assigned the PID of the dead process will receive the signal, with indeterminable consequences. This method should fire a close event, which the signal used to close the process.
[ 198 ]
Chapter 7
- child.disconnect(): This command severs the IPC connection between the child and its parent. The child will then die gracefully, as it has no IPC channel to keep it alive. You may also call process.disconnect() from within the child itself. Once a child has disconnected, the connected flag on that child reference will be set to false.
Sending messages to children
As we saw in our discussion of fork, and when using the ipc option on spawn, child processes can be sent messages via child.send, with the message passed as the first argument. A TCP server, or socket handle, can be passed along with the message as a second argument. In this way, a TCP server can spread requests across multiple child processes. For example, the following server distributes socket handling across a number of child processes equaling the total number of CPUs available. Each forked child is given a unique ID, which it reports when started. Whenever the TCP server receives a socket, that socket is passed as a handle to a random child process. That child process then sends a unique response, demonstrating that socket handling is being distributed.
- Parent
var fork = require('child_process').fork; var net = require('net'); var children = [];
require('os').cpus().forEach(function(f, idx) { children.push(fork("./child.js", [idx])); });
net.createServer(function(socket) { var rand = Math.floor(Math.random() * children.length); children[rand].send(null, socket); }).listen(8080);
- Child
var id = process.argv[2]; process.on('message', function(n, socket) { socket.write('child ' + id + ' was your server today.\r\n'); socket.end(); });
[ 199 ]
Utilizing Multiple Processes
Start the parent server in a terminal window. In another window, run telnet 127.0.0.1 8080. You should see something similar to the following output, with a random child ID being displayed on each connection (assuming there exist multiple cores):
Trying 127.0.0.1...
…
child 3 was your server today.
Connection closed by foreign host.
Parsing a file using multiple processes
One of the tasks many developers will take on is the building of a logfile processor. A logfile can be very large and many megabytes long. Any single program working on a very large file can easily run into memory problems or simply run much too slowly. It makes sense to process a large file in pieces. We're going to build a simple log processor that breaks up a big file into pieces and assigns one to each of several child workers, running them in parallel.
The entire code for this example can be found in the logproc folder of the code bundle. We will focus on the main routines:
-
Determining the number of lines in the logfile
-
Breaking those up into equal chunks
-
Creating one child for each chunk and passing it parse instructions
-
Assembling and displaying the results
To get the word count of our file, we use the wc command with child.exec as shown in the following code:
child.exec("wc -l " + filename, function(e, fL) { fileLength = parseInt(fL.replace(filename, "")); var fileRanges = []; var oStart = 1; var oEnd = fileChunkLength;
while(oStart < fileLength) { fileRanges.push({ offsetStart : oStart, offsetEnd : oEnd })
[ 200 ]
Chapter 7
oStart = oEnd + 1; oEnd = Math.min(oStart + fileChunkLength, fileLength); }
Let's say we use fileChunkLength of 500,000 lines. This means four child processes are to be created, and each will be told to process a range of 500,000 lines in our file, such as 1 to 500,000:
var w = child.fork('bin/worker'); w.send({ file : filename, offsetStart : range.offsetStart, offsetEnd : range.offsetEnd }); w.on('message', function(chunkData) { // pass results data on to a reducer. });
Each of these workers will themselves use a child process to grab their allotted chunk, employing sed, the native Stream Editor for Unix:
process.on('message', function(m) { var filename = m.file;
var sed = "sed -n '" + m.offsetStart + "," + m.offsetEnd + "p' " + filename;
var reader = require('child_process').exec(sed, { maxBuffer : 1024 * 1000000 }, function(err, data, stderr) {
// Split the file chunk into lines and process it. // data = data.split("\n"); ...
[ 201 ]
Utilizing Multiple Processes
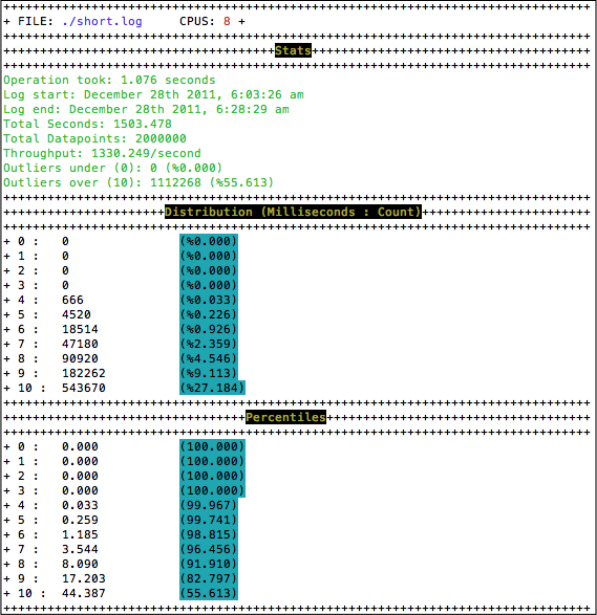
Here we are executing the command sed –n '500001,1000001p' logfile.txt, which plucks the given range of lines and returns them for processing. Once we're done processing the columns of data (adding them up, and so forth), this child will return its data to the master (as previously described) and the data results will be written to a file, otherwise manipulated, or sent to stdout, as shown in the following output:
The full file for this example is much longer, but all of that extra code is merely formatting and other detail—the Node child process management we have described suffices to create a parallelized system for number crunching that will process many millions of lines of code in seconds. By using more processes, spread across more cores, the log parsing speed can be reduced even further.
Once you have the logproc folder, run the command npm install, and execute an example log parse with the command node bin/ master.js –f ./short.log –rmin 0 –rmax 20. You should see a simple distribution mapping of the data contained in short.log. Go ahead and play with the numbers.
[ 202 ]
 Chapter 7
Using the cluster module
As we saw when processing large logfiles, the pattern of a master parent controller for many child processes is just right for vertical scaling in Node. In response to this, the Node API has been augmented by a cluster module, which formalizes this pattern and helps to make its achievement easier. Continuing with Node's core purpose of helping to make scalable network software easier to build, the particular goal of cluster is to facilitate the sharing of network ports amongst many children.
For example, the following code creates a cluster of worker processes all sharing the same HTTP connection:
var cluster = require('cluster'); var http = require('http'); var numCPUs = require('os').cpus().length;
if(cluster.isMaster) { for(var i = 0; i < numCPUs; i++) { cluster.fork(); } }
if(cluster.isWorker) { http.createServer(function(req, res) { res.writeHead(200); res.end("Hello from " + cluster.worker.id); }).listen(8080); }
We'll dig into the details shortly. For now, notice that cluster.fork has taken zero arguments. What does fork without a command or file argument do? Within a cluster, the default action is to fork the current program. We see during cluster. isMaster, the action is to fork children (one for each available CPU). When this program is re-executed in a forking context, cluster.isWorker will be true and a new HTTP server running on a shared port is started. Multiple processes are sharing the load for a single server.
Start and connect to this server with a browser. You will see something like Hello from 8, the integer corresponding to the unique cluster.worker.id value of the worker that assigned responsibility for handling your request. Balancing across all workers is handled automatically, such that refreshing your browser a few times will result in different worker IDs being displayed.
[ 203 ]
Utilizing Multiple Processes
Later on, we'll go through an example of sharing a socket server across a cluster. For now, we'll lay out the cluster API, which breaks down into two sections: the methods, attributes, and events available to the cluster master, and those available to the child. As workers in this context are defined using fork, the documentation for that method of child_process can applied here as well.
-
cluster.isMaster: This is the Boolean value indicating whether the process is a master.
-
cluster.isWorker: This is the Boolean value indicating whether the process was forked from a master.
-
cluster.worker: This will bear a reference to the current worker object, only available to a child process.
-
cluster.workers: This is a hash containing references to all active worker objects, keyed by the worker ID. Use this to loop through all worker objects. This only exists within the master process.
-
cluster.setupMaster([settings]): This is a convenient way of passing a map of default arguments to be used when a child is forked. If all children are going to fork the same file (as is often the case), you will save time by setting it here. The available defaults are as follows:
° ° exec (String): This is the file path to the process file, defaulting to __filename.
° ° args (Array): This contains Strings sent as arguments to the child process. The default is to fetch arguments with process.argv. slice(2).
° ° silent (Boolean): This specifies whether or not to send output to the master's stdio, defaulting to false.
-
cluster.fork([env]): This creates a new worker process. Only the master process may call this method. To expose a map of key-value pairs to the child's process environment, send an object to env.
-
cluster.disconnect([callback]): This is used to terminate all workers in a cluster. Once all the workers have died gracefully, the cluster process will itself terminate if it has no further events to wait on. To be notified when all children have expired, pass callback.
[ 204 ]
Chapter 7
Cluster events
The cluster object emits several events listed as follows:
-
fork: This is fired when the master tries to fork a new child. This is not the same as online. This receives a worker object.
-
online: This is fired when the master receives notification that a child is fully bound. This differs from the fork event and receives a worker object.
-
listening: When the worker performs an action that requires a listen() call (such as starting an HTTP server), this event will be fired in the master. The event emits two arguments: a worker object, and the address object containing the address, port, and addressType values of the connection.
-
disconnect: This is called whenever a child disconnects, which can happen either through process exit events or after calling child.kill(). This will fire prior to the exit event—they are not the same. This receives a worker object.
-
exit: Whenever a child dies this event is emitted. The event receives three arguments: a worker object, the exit code number, and the signal string, such as SIGNUP, which caused the process to be killed.
-
setup: This is called after cluster.setupMaster has executed.
Worker object properties
Workers have the following attributes and methods:
-
worker.id: This is the unique ID assigned to a worker, also representing the worker's key in the cluster.workers index.
-
worker.process: This specifies a ChildProcess object referencing a worker.
-
worker.suicide: The workers that have recently had kill or disconnect called on them will have their suicide attribute set to true.
-
worker.send(message, [sendHandle]): Refer to child_process.fork(), which is previously mentioned.
-
worker.kill([signal]): This kills a worker. The master can check this worker's suicide property in order to determine if the death was intentional or accidental. The default signal value that is sent is SIGTERM.
-
worker.disconnect(): This instructs a worker to disconnect. Importantly, existing connections to the worker are not immediately terminated (as with kill), but are allowed to exit normally prior to the worker fully disconnecting. This is because existing connections may stay in existence for a very long time. It is a good pattern to regularly check if the worker has actually disconnected, perhaps using timeouts.
[ 205 ]
Utilizing Multiple Processes
Worker events
Workers also emit events, such as the ones mentioned in the following list:
-
message: See child_process.fork
-
online: This is identical to cluster.online, except that the check is against only the specified worker
-
listening: This is identical to cluster.listening, except that the check is against only the specified worker
-
disconnect: This is identical to cluster.disconnect, except that the check is against only the specified worker
-
exit: See the exit event for child_process
-
setup: This is called after cluster.setupMaster has executed
Now, using what we now know about the cluster module, let's implement a real-time tool for analyzing the streams of data emitted by many users simultaneously interacting with an application.
Real-time activity updates of multiple worker results
Using what we've learned we are going to construct a multiprocess system to track the behavior of all visitors to a sample web page. This will be composed of two main segments: a WebSocket-powered client library, which will broadcast each time a user moves a mouse, and an administration interface visualizing user interaction as well as when a user connects and disconnects from the system. Our goal is to show how a more complex system might be designed (such as one that tracks and graphs every click, swipe, or other interaction a user might make). The final administration interface will show activity graphs for several users and resemble this:
[ 206 ]
Chapter 7
Because this system will be tracking the X and Y positions of each mouse motion made by all users, we will spread this continuous stream of data across all available machine cores using cluster, with each worker in the cluster sharing the burden of carrying the large amounts of socket data being fed into a single, shared port.
A good place to start is in designing the mock client page, which is responsible solely for catching all mouse movement events and broadcasting them, through a WebSocket, to our clustered socket server. We are using the native WebSocket implementation; you may want to use a library to handle older browsers (such as Socket.IO):
<head> <script> var connection = new WebSocket('ws://127.0.0.1:8081', ['json']); connection.onopen = function() { var userId = 'user' + Math.floor(Math.random()*10e10); document.onmousemove = function(e) { connection.send(JSON.stringify({ id : userId, x : e.x,
[ 207 ]
 Utilizing Multiple Processes
y : e.y })); } }; </script> </head>
Here, we need to simply turn on the basic mousemove tracking, which will broadcast the position of a user's mouse on each movement to our socket. Additionally, we send along a unique user ID, as a tracking client identity will be important to us later on. Note that in a production environment you will want to implement a more intelligent unique ID generator, likely though a server-side authentication module.
In order for this information to reach other clients, a centralized socket server must be set up. As mentioned, we will want this socket server to be clustered. Clustered child processes, each duplicates of the following program, will handle mouse data sent by clients:
var SServer = require('ws').Server; var socketServer = new SServer({ port: 8081 }); socketServer.on('connection', function(socket) { var lastMessage = null; var kill = function() { if(lastMessage) { process.send({ kill : lastMessage.id }); } }; socket.on('message', function(message) { lastMessage = JSON.parse(message); process.send(lastMessage); }); socket.on('close', kill); socket.on('error', kill); });
In this demonstration, we are using Einar Otto Stangvik's very fast and well-designed socket server library, ws, which is hosted on GitHub at https://github.com/einaros/ws.
[ 208 ]
Chapter 7
Thankfully our code remains very simple. We have a socket server listening for messages (remember that the client is sending an object with mouse X and Y, as well as a user ID). Finally, when data is received (the message event), we parse the received JSON into an object and pass that back to our cluster master via process.send. Note as well how we store the last message (lastMessage), done for bookkeeping reasons, as when a connection terminates we will need to pass along the last user ID seen on this connection to administrators.
The pieces to catch client data broadcasts are now set up. Once this data is received, how is it passed to the administration interface previously pictured?
We've designed this system with scaling in mind, and we want to decouple the collection of data from the systems that broadcast data. Our cluster of socket servers can accept a constant flow of data from many thousands of clients, and should be optimized for doing just that. In other words, the cluster should delegate the responsibility for broadcasting mouse activity data to another system, even to other servers.
In the next chapter we will look at more advanced scaling and messaging tools, such as message queues and UDP broadcasting. For our purposes here, we will simply create an HTTP server responsible for managing connections from administrators, and broadcasting mouse activity updates to them. We will use SSE for this, as the data flow need only be one-way, from server to client.
The HTTP server will implement a very basic validation system for administrator logins, holding on to successful connections in a way that will allow our socket cluster to broadcast mouse activity updates to all. It will also serve as a basic static file server, sending both the client and administration HTML when requested, though we will focus only on how it handles two routes: admin/adminname; and /receive/adminname. Once the server is understood, we will then go into how our socket cluster connects to it.
The first route /admin/adminname is mostly responsible for validating administrator login, also ensuring that this is not a duplicate login. Once that identity is established, we can send back an HTML page to the administration interface. The specific client code used to draw the graphs previously pictured won't be discussed here. What we do need is an SSE connection to our server such that the interface's graphing tools receive real-time updates of mouse activity. Some JavaScript on the returned administrator's page establishes such a connection:
var ev = new EventSource('/receive/adminname'); ev.addEventListener("open", function() { console.log("Connection opened"); });
[ 209 ]
Utilizing Multiple Processes
ev.addEventListener("message", function(data) { // Do something with mouse data, like graph it. }
On our server we implement the /receive/adminname route:
if(method === "receive") { // Unknown admin; reject if(!admins[adminId]) { return response.end(); } response.writeHead(200, { "Content-Type": "text/event-stream", "Cache-Control": "no-cache", "Connection": "keep-alive" }); response.write(":" + Array(2049).join(" ") + "\n"); response.write("retry: 2000\n"); response.on("close", function() { admins[adminId] = {}; }); setInterval(function() { response.write("data: PING\n\n"); }, 15000);
admins[adminId].socket = response; return; }
The main purpose of this route is to establish an SSE connection and to store the administrator's connection, such that we can later broadcast to it.
[ 210 ]
Chapter 7
We will now add the pieces that will pass mouse activity data along to a visualization interface. Scaling this subsystem across cores using the cluster module is our next step. The cluster master now simply needs to wait for mouse data from its socketserving children, as previously described.
We will use the same ideas presented in the earlier discussion of cluster, simply forking the preceding socket server code across all available CPUs:
if(cluster.isMaster) { var i; for(i=0; i < numCPUs; i++) { cluster.fork(); } cluster .on('exit', function(worker, code, signal) { console.log('worker ' + worker.process.pid + ' died'); }) // ...adding other listeners as needed
// Set up socket worker listeners Object.keys(cluster.workers).forEach(function(id) { cluster.workers[id].on('message', function(msg) { var a; for(a in admins) { if(admins[a].socket) { admins[a].socket.write("data: " + JSON.stringify(msg) + "\n\n"); } } }); }); }
Mouse activity data pipes into a cluster worker through a socket and is broadcasted via process.send to the cluster master previously described. On each worker message we run through all connected administrators and send mouse data to their visualization interfaces, using SSE. The administrators can now watch for the arrival and exit of clients, as well as their individual level of activity.
[ 211 ]
Utilizing Multiple Processes
Summary
This is the first chapter where we've really begun to test Node's scalability goal. Having considered the various arguments for and against different ways of thinking about concurrency and parallelism, we arrived at an understanding of how Node has successfully maintained the advantages of threading and parallel processing while wrapping all of that complexity within a concurrency model that is both easy to reason about and robust.
Having gone deeper into how processes work, and in particular how child processes can communicate with each other, even spawn further children, we looked at two use cases. An example of how to combine native Unix command processes seamlessly with custom Node processes led us to a performant and straightforward technique for processing large files. The cluster module was then applied to the problem of how to share responsibility for handling a busy socket between multiple workers, this ability to share socket handles between processes demonstrating a powerful aspect of Node's design.
Having seen how Node applications might be scaled vertically, we can now look into horizontal scaling across many systems and servers. In the next chapter we'll learn how to connect Node with third-party services, such as Amazon and Facebook, communicate across networks with message queues, set up multiple Node servers behind proxies, and more.
[ 212 ]
Made by Anh Tu - Share to be share