[Mastering NodeJS - PACKT] Từ trang 72 đến 104

Đây là nội dung được trích xuất từ "Mastering NodeJS - PACKT" (Tác giả: Unknown Author). Bài được extract tự động bởi Aha! Mind Interpreter.
A jug fills drop by drop.
— Buddha
We now have a clearer picture of how the evented, I/O-focused design ethic of Node is reflected across its various module APIs, delivering a consistent and predictable environment for development. In this chapter we will discover how data, of many shapes and sizes, pulled from files or other sources, can be read, written, and manipulated just as easily using Node. Ultimately we will learn how to use Node to develop networked servers with rapid I/O interfaces that support highly concurrent applications sharing real-time data across thousands of clients simultaneously.
Those who work with Internet-based software will have heard about "Big Data". The importance of I/O efficiency is not lost on those witnessing this explosive growth in data volume.
Implied by this expansion in data is an increase in the size of individual media objects transmitted over the network. The videos being watched are longer. The images being viewed are bigger. The searches are wider and the result sets are larger.
Additionally, scaled network applications are normally spread across many servers, requiring that the processing of data streams be distributed across processes. Additionally, the funneling of disparate streams into a single custom output stream has become the signature of cloud services and various other APIs.
Anyone who has visited a website specializing in the display of large media objects (such as videos) has likely also experienced latency. In an ideal world, one would make a request to a server for lolcats.mpg and would receive this file instantly.
Streaming Data Across Nodes and Clients
However, moving large amounts of data (bytes) takes time. As the size of files accessible over the Internet began to grow in size, from some number of kilobytes to many gigabytes, download times grew in parallel, from several minutes to several hours. Originally, in order to view a video, one's media viewer (often a browser) required a complete copy prior to commencing playback. For the user, this meant long waiting times spent staring at the progress bar or spinning icons. It took very little vision to see that this solution was untenable.
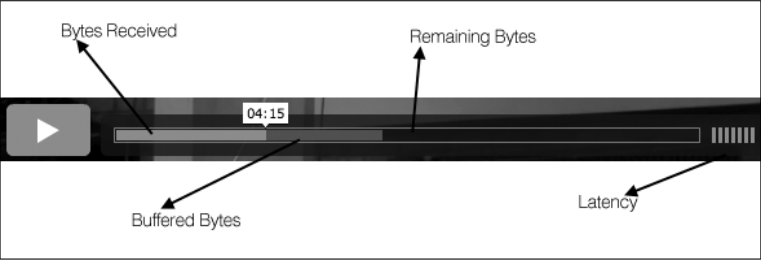
Because the demand was so high for large media objects, those who had an interest in distributing these objects encouraged the development of better distribution mechanisms. As Internet became the world's de-facto information distribution network, for both fixed media objects and live data broadcasts, better solutions arrived. In particular, streaming media became the standard. The reader will certainly be familiar with streaming media, and in particular the idea of buffering a stream. Small chunks (for example a video stream is "played" as they are received) arriving too early are buffered (helping with "hiccups" and latency), until the entire file has arrived:
Here, a streaming file is simply a stream of data partitioned into slices, where each slice can be viewed independently irrespective of the availability of others. One can write to a data stream, or listen on a data stream, free to dynamically allocate bytes, to ignore bytes, to re-route bytes. Streams of data can be chunked, many processes can share chunk handling, chunks can be transformed and reinserted, and data flows can be precisely emitted and creatively managed.
Recalling our discussion on modern software and the Rule of Modularity, we can see how streams facilitate the creation of independent share-nothing processes that do one task well, and in combination can compose a predictable architecture whose complexity does not preclude an accurate appraisal of its shape. If the interfaces to data are uncontroversial, the data map can be accurately modeled independent of considerations about data volume or routing.
[ 56 ]
 Chapter 3
Managing I/O in Node involves managing data events bound to data streams. A Node Stream object is an instance of EventEmitter. This abstract interface is implemented in various Node modules and objects. Let's begin by understanding Node's Stream module, then move on to a discussion of how network I/O in Node is handled via various Stream implementations; in particular, the HTTP module.
Exploring streams
According to Bjarne Stoustrup in his book The C++ Programming Language, Third Edition :
Designing and implementing a general input/output facility for a programming language is notoriously difficult... An I/O facility should be easy, convenient, and safe to use; efficient and flexible; and, above all, complete.
It shouldn't surprise anyone that a design team, focused on providing efficient and easy I/O, has delivered such a facility through Node. Through a symmetrical and simple interface, which handles data buffers and stream events so that the implementer does not have to, Node's Stream module is the preferred way to manage asynchronous data streams for both internal modules and, hopefully, for the modules developers will create.
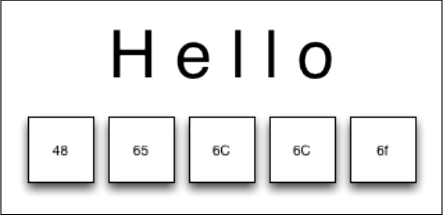
A stream in Node is simply a sequence of bytes. At any time, a stream contains a buffer of bytes, and this buffer has a zero or greater length:
Because each character in a stream is well defined, and because every type of digital data can be expressed in bytes, any part of a stream can be redirected, or "piped", to any other stream, different chunks of the stream can be sent do different handlers, and so on. In this way stream input and output interfaces are both flexible and predictable and can be easily coupled.
[ 57 ]
 Streaming Data Across Nodes and Clients
Digital streams are well described using the analogy of fluids, where individual bytes (drops of water) are being pushed through a pipe. In Node, streams are objects representing data flows that can be written to and read from asynchronously. The Node philosophy is a non-blocking flow, I/O is handled via streams, and so the design of the Stream API naturally duplicates this general philosophy. In fact, there is no other way of interacting with streams except in an asynchronous, evented manner—you are prevented, by design, from blocking I/O.
Five distinct base classes are exposed via the abstract Stream interface: Readable, Writable, Duplex, Transform, and PassThrough. Each base class inherits from EventEmitter, which we know of as an interface to which event listeners and emitters can be bound.
As we will learn, and here will emphasize, the Stream interface is an abstract interface. An abstract interface functions as a kind of blueprint or definition, describing the features that must be built into each constructed instance of a Stream object. For example, a Readable stream implementation is required to implement a public read method which delegates to the interface's internal _read method.
In general, all stream implementations should follow these guidelines:
-
As long as data exists to send, write to a stream until that operation returns false, at which point the implementation should wait for a drain event, indicating that the buffered stream data has emptied
-
Continue to call read until a null value is received, at which point wait for a readable event prior to resuming reads
-
Several Node I/O modules are implemented as streams. Network sockets, file readers and writers, stdin and stdout, zlib, and so on. Similarly, when implementing a readable data source, or data reader, one should implement that interface as a Stream interface.
It is important to note that as of Node 0.10.0 the Stream interface changed in some fundamental ways. The Node team has done its best to implement backwards-compatible interfaces, such that (most) older programs will continue to function without modification. In this chapter we will not spend any time discussing the specific features of this older API, focusing on the current (and future) design. The reader is encouraged to consult Node's online documentation for information on migrating older programs.
[ 58 ]
Chapter 3
Implementing readable streams
Streams producing data that another process may have an interest in are normally implemented using a Readable stream. A Readable stream saves the implementer all the work of managing the read queue, handling the emitting of data events, and so on.
To create a Readable stream:
var stream = require('stream'); var readable = new stream.Readable({ encoding : "utf8", highWaterMark : 16000, objectMode: true });
As previously mentioned, Readable is exposed as a base class, which can be initialized through three options:
-
encoding : Decode buffers into the specified encoding, defaulting to UTF-8.
-
highWaterMark : Number of bytes to keep in the internal buffer before ceasing to read from the data source. The default is 16 KB.
-
objectMode : Tell the stream to behave as a stream of objects instead of a stream of bytes, such as a stream of JSON objects instead of the bytes in a file. Default false.
In the following example we create a mock Feed object whose instances will inherit the Readable stream interface. Our implementation need only implement the abstract _read method of Readable, which will push data to a consumer until there is nothing more to push, at which point it triggers the Readable stream to emit an "end" event by pushing a null value:
var Feed = function(channel) { var readable = new stream.Readable({ encoding : "utf8" }); var news = [ "Big Win!", "Stocks Down!", "Actor Sad!" ]; readable._read = function() { if(news.length) { return readable.push(news.shift() + "\n"); } readable.push(null); }; return readable; }
[ 59 ]
Streaming Data Across Nodes and Clients
Now that we have an implementation, a consumer might want to instantiate the stream and listen for stream events. Two key events are readable and end .
The readable event is emitted as long as data is being pushed to the stream. It alerts the consumer to check for new data via the read method of Readable.
Note again how the Readable implementation must provide a private _read method, which services the public read method exposed to the consumer API.
The end event will be emitted whenever a null value is passed to the push method of our Readable implementation.
Here we see a consumer using these methods to display new stream data, providing a notification when the stream has stopped sending data:
var feed = new Feed(); feed.on("readable", function() { var data = feed.read(); data && process.stdout.write(data); }); feed.on("end", function() { console.log("No more news"); });
Similarly, we could implement a stream of objects through the use of the objectMode option:
var readable = new stream.Readable({ objectMode : true }); var prices = [ { price : 1 }, { price : 2 } ]; ... readable.push(prices.shift());
// > { prices : 1 } // > { prices : 2 }
Here we see that each read event is receiving an object, rather than a buffer or string.
[ 60 ]
Chapter 3
Finally, the read method of a Readable stream can be passed a single argument indicating the number of bytes to be read from the stream's internal buffer. For example, if it was desired that a file should be read one byte at a time, one might implement a consumer using a routine similar to:
readable.push("Sequence of bytes"); ... feed.on("readable", function() { var character; while(character = feed.read(1)) { console.log(character); }; }); // > S // > e // > q // > ...
Here it should be clear that the Readable stream's buffer was filled with a number of bytes all at once, but was read from discretely.
Pushing and pulling
We have seen how a Readable implementation will use push to populate the stream buffer for reading. When designing these implementations it is important to consider how volume is managed, at either end of the stream. Pushing more data into a stream than can be read can lead to complications around exceeding available space (memory). At the consumer end it is important to maintain awareness of termination events, and how to deal with pauses in the data stream.
One might compare the behavior of data streams running through a network with that of water running through a hose.
As with water through a hose, if a greater volume of data is being pushed into the read stream than can be efficiently drained out of the stream at the consumer end through read, a great deal of back pressure builds, causing a data backlog to begin accumulating in the stream object's buffer. Because we are dealing with strict mathematical limitations, read simply cannot be compelled to release this pressure by reading more quickly—there may be a hard limit on available memory space, or other limitation. As such, memory usage can grow dangerously high, buffers can overflow, and so forth.
[ 61 ]
Streaming Data Across Nodes and Clients
A stream implementation should therefore be aware of, and respond to, the response from a push operation. If the operation returns false this indicates that the implementation should cease reading from its source (and cease pushing) until the next _read request is made.
In conjunction with the above, if there is no more data to push but more is expected in the future the implementation should push an empty string (""), which adds no data to the queue but does ensure a future readable event.
While the most common treatment of a stream buffer is to push to it (queuing data in a line), there are occasions where one might want to place data on the front of the buffer (jumping the line). Node provides an unshift operation for these cases, which behavior is identical to push, outside of the aforementioned difference in buffer placement.
Writable streams
A Writable stream is responsible for accepting some value (a stream of bytes, a string) and writing that data to a destination. Streaming data into a file container is a common use case.
To create a Writable stream:
var stream = require('stream'); var readable = new stream.Writable({ highWaterMark : 16000, decodeStrings: true });
The Writable streams constructor can be instantiated with two options:
-
highWaterMark : The maximum number of bytes the stream's buffer will accept prior to returning false on writes. Default is 16 KB
-
decodeStrings : Whether to convert strings into buffers before writing. Default is true.
As with Readable streams, custom Writable stream implementations must implement a _write handler, which will be passed the arguments sent to the write method of instances.
[ 62 ]
Chapter 3
One should think of a Writable stream as a data target, such as for a file you are uploading. Conceptually this is not unlike the implementation of push in a Readable stream, where one pushes data until the data source is exhausted, passing null to terminate reading. For example, here we write 100 bytes to stdout:
var stream = require('stream');
var writable = new stream.Writable({
decodeStrings: false
});
writable._write = function(chunk, encoding, callback) {
console.log(chunk);
callback();
}
var w = writable.write(new Buffer(100));
writable.end();
console.log(w); // Will betrue
There are two key things to note here.
First, our _write implementation fires the callback function immediately after writing, a callback that is always present, regardless of whether the instance write method is passed a callback directly. This call is important for indicating the status of the write attempt, whether a failure (error) or a success.
Second, the call to write returned true. This indicates that the internal buffer of the Writable implementation has been emptied after executing the requested write. What if we sent a very large amount of data, enough to exceed the default size of the internal buffer? Modifying the above example, the following would return false:
var w = writable.write(new Buffer(16384)); console.log(w); // Will be 'false'
The reason this write returns false is that it has reached the highWaterMark option—default value of 16 KB ( 16 * 1024 ). If we changed this value to 16383, write would again return true (or one could simply increase its value).
What to do when write returns false? One should certainly not continue to send data! Returning to our metaphor of water in a hose: when the stream is full, one should wait for it to drain prior to sending more data. Node's Stream implementation will emit a drain event whenever it is safe to write again. When write returns false listen for the drain event before sending more data.
[ 63 ]
Streaming Data Across Nodes and Clients
Putting together what we have learned, let's create a Writable stream with a highWaterMark value of 10 bytes. We will send a buffer containing more than 10 bytes (composed of A characters) to this stream, triggering a drain event, at which point we write a single Z character. It should be clear from this example that Node's Stream implementation is managing the buffer overflow of our original payload, warning the original write method of this overflow, performing a controlled depletion of the internal buffer, and notifying us when it is safe to write again:
var stream = require('stream'); var writable = new stream.Writable({ highWaterMark: 10 }); writable._write = function(chunk, encoding, callback) { process.stdout.write(chunk); callback(); } writable.on("drain", function() { writable.write("Z\n"); }); var buf = new Buffer(20, "utf8"); buf.fill("A");
console.log(writable.write(buf.toString())); // false
The result should be a string of 20 A characters, followed by false, then followed by the character Z.
The fluid data in a Readable stream can be easily redirected to a Writable stream. For example, the following code will take any data sent by a terminal (stdin is a Readable stream) and pass it to the destination Writable stream, stdout:
process.stdin.pipe(process.stdout);
Whenever a Writable stream is passed to a Readable stream's pipe method, a pipe event will fire. Similarly, when a Writable stream is removed as a destination for a Readable stream, the unpipe event fires.
To remove a pipe, use the following:
unpipe(destination stream)
[ 64 ]
Chapter 3
Duplex streams
A duplex stream is both readable and writeable. For instance, a TCP server created in Node exposes a socket that can be both read from and written to:
var stream = require("stream"); var net = require("net"); net .createServer(function(socket) { socket.write("Go ahead and type something!"); socket.on("readable", function() { process.stdout.write(this.read()) }); }) .listen(8080);
When executed, this code will create a TCP server that can be connected to via Telnet:
telnet 127.0.0.1 8080
Upon connection, the connecting terminal will print out Go ahead and type something! - writing to the socket. Any text entered in the connecting terminal will be echoed to the stdout of the terminal running the TCP server ( reading from the socket). This implementation of a bi-directional (duplex) communication protocol demonstrates clearly how independent processes can form the nodes of a complex and responsive application, whether communicating across a network or within the scope of a single process.
The options sent when constructing a Duplex instance merge those sent to Readable and Writable streams, with no additional parameters. Indeed, this stream type simply assumes both roles, and the rules for interacting with it follow the rules for the interactive mode being used.
As a Duplex stream assumes both read and write roles, any implementation is required to implement both _write and _read methods, again following the standard implementation details given for the relevant stream type.
Transforming streams
On occasion stream data needs to be processed, often in cases where one is writing some sort of binary protocol or other "on the fly" data transformation. A Transform stream is designed for this purpose, functioning as a Duplex stream that sits between a Readable stream and a Writable stream.
[ 65 ]
Streaming Data Across Nodes and Clients
A Transform stream is initialized using the same options used to initialize a typical Duplex stream. Where Transform differs from a normal Duplex stream is in its requirement that the custom implementation merely provide a _transform method, excluding the _write and _read method requirement.
The _transform method will receive three arguments, first the sent buffer, an optional encoding argument, and finally a callback which _transform is expected to call when the transformation is complete:
_transform = function(buffer, encoding, cb) { var transformation = "..."; this.push(transformation) cb(); }
Let's imagine a program that wishes to convert ASCII ( American Standard Code for Information Interchange ) codes into ASCII characters, receiving input from stdin. We would simply pipe our input to a Transform stream, then piping its output to stdout:
var stream = require('stream'); var converter = new stream.Transform(); converter._transform = function(num, encoding, cb) { this.push(String.fromCharCode(new Number(num)) + "\n") cb(); } process.stdin.pipe(converter).pipe(process.stdout);
Interacting with this program might produce an output resembling the following:
65 A 66 B 256 Ā 257 ā
An example of a transform stream will be demonstrated in the example that ends this chapter.
Using PassThrough streams
This sort of stream is a trivial implementation of a Transform stream, which simply passes received input bytes through to an output stream. This is useful if one doesn't require any transformation of the input data, and simply wants to easily pipe a Readable stream to a Writable stream.
[ 66 ]
Chapter 3
PassThrough streams have benefits similar to JavaScript's anonymous functions, making it easy to assert minimal functionality without too much fuss. For example, it is not necessary to implement an abstract base class, as one does with for the _read method of a Readable stream. Consider the following use of a PassThrough stream as an event spy:
var fs = require('fs'); var stream = new require('stream').PassThrough(); spy.on('end', function() { console.log("All data has been sent"); }); fs.createReadStream("./passthrough.js").pipe(spy).pipe(process.std out);
Creating an HTTP server
HTTP is a stateless data transfer protocol built upon a request/response model: clients make requests to servers, which then return a response. Facilitating this sort of rapid patter network communication is the sort of I/O Node is designed to excel at, it has unsurprisingly become identified as primarily a toolkit for creating servers—though it can certainly be used to do much, much more. Throughout this book we will be creating many implementations of HTTP servers, as well as other protocol servers, and will be discussing best practices in more depth, contextualized within specific business cases. It is expected that you have already had some experience doing the same. For both of these reasons we will quickly move through a general overview into some more specialized uses.
At its simplest, an HTTP server responds to connection attempts, and manages data as it arrives and as it is sent along. A Node server is typically created using the createServer method of the http module:
var http = require('http'); var server = http.createServer(function(request, response) { console.log("Got Request Headers:"); console.log(request.headers); response.writeHead(200, { 'Content-Type': 'text/plain' }); response.write("PONG"); response.end(); });
server.listen(8080);
[ 67 ]
Streaming Data Across Nodes and Clients
The object returned by http.createServer is an instance of http.Server, which extends EventEmitter, broadcasting network events as they occur, such as a client connection or request. The above code is a common way to write Node servers. However, it is worth pointing out that directly instantiating the http.Server class is sometimes a useful way to distinguish distinct server/client interactions. We will use that format for the following examples.
Here, we create a basic server that simply reports when a connection is made, and when it is terminated:
var http = require('http'); var server = new http.Server(); server.on("connection", function(socket) { console.log("Client arrived: " + new Date()); socket.on("end", function() { console.log("Client left: " + new Date()); }); }) server.listen(8080);
When building multiuser systems, especially authenticated multiuser systems, this point in the server-client transaction is an excellent place for client validation and tracking code, including setting or reading of cookies and other session variables, or the broadcasting of a client arrival event to other clients working together in a concurrent real-time application.
By adding a listener for requests we arrive at the more common request/response pattern, handled as a Readable stream. When a client POSTs some data, we can catch that data like the following:
server.on("request", function(request, response) { request.setEncoding("utf8"); request.on("readable", function() { console.log(request.read()) }); });
Try sending some data to this server using curl :
curl http://localhost:8080 -d "Here is some data"
By using connection events we can nicely separate our connection handling code, grouping it into clearly defined functional domains correctly described as executing in response to particular events.
[ 68 ]
Chapter 3
For example, we can set timers on server connections. Here we terminate client connections that fail to send new data within a roughly two second window:
server.setTimeout(2000, function(socket) { socket.write("Too Slow!", "utf8"); socket.end(); });
If one simply wants to set the number of milliseconds of inactivity before a socket is presumed to have timed out, simply use server.timeout = (Integer)num_milliseconds. To disable socket timeouts, pass a value of 0(zero).
Let's now take a look at how Node's HTTP module can be used to enter into more interesting network interactions.
Making HTTP requests
It is often necessary for a network application to make external HTTP calls. HTTP servers are also often called upon to perform HTTP services for clients making requests. Node provides an easy interface for making external HTTP calls.
For example, the following code will fetch the front page of google.com:
var http = require('http'); http.request({ host: 'www.google.com', method: 'GET', path: "/" }, function(response) { response.setEncoding("utf8"); response.on("readable", function() { console.log(response.read()) }); }).end();
As we can see, we are working with a Readable stream, which can be written to a file.
A popular Node module for managing HTTP requests is Mikeal Rogers ' request :
https://github.com/mikeal/request
[ 69 ]
Streaming Data Across Nodes and Clients
Because it is common to use HTTP.request in order to GET external pages, Node offers a shortcut:
http.get("http://www.google.com/", function(response) { console.log("Status: " + response.statusCode); }).on('error', function(err) { console.log("Error: " + err.message); });
Let's now look at some more advanced implementations of HTTP servers, where we perform general network services for clients.
Proxying and tunneling
Sometimes it is useful to provide a means for one server to function as a proxy, or broker, for other servers. This would allow one server to distribute load to other servers, for example. Another use would be to provide access to a secured server to users who are unable to connect to that server directly. It is also common to have one server answering for more than one URL—by using a proxy, that one server can forward requests to the right recipient.
Because Node has a consistent streams interface throughout its network interfaces, we can build a simple HTTP proxy in just a few lines of code. For example, the following program will set up an HTTP server on port 8080 which will respond to any request by fetching the front page of Google and piping that back to the client:
var http = require('http'); var server = new http.Server(); server.on("request", function(request, socket) { http.request({ host: 'www.google.com', method: 'GET', path: "/", port: 80 }, function(response) { response.pipe(socket); }).end(); }); server.listen(8080);
Once this server receives the client socket, it is free to push content from any readable stream back to the client, and here the result of GET of www.google.com is so streamed. One can easily see how an external content server managing a caching layer for your application might become a proxy endpoint, for example.
[ 70 ]
Chapter 3
Using similar ideas we can create a tunneling service, using Node's native CONNECT support. Tunneling involves using a proxy server as an intermediary to communicate with a remote server on behalf of a client. Once our proxy server connects to a remote server, it is able to pass messages back and forth between that server and a client. This is advantageous when a direct connection between a client and a remote server is not possible, or not desired.
First, we'll set up a proxy server responding to HTTP CONNECT requests, then make a CONNECT request to that server. The proxy receives our client's Request object, the client's socket itself, and the head (the first packet) of the tunneling stream. We then open the requested remote network socket. All that is left to do is creating the tunnel, which we do by piping remote data to the client, and client data to the remote connection:
var http = require('http');
var net = require('net');
var url = require('url');
var proxy = new http.Server();
proxy.on('connect', function(request, clientSocket, head) {
var reqData = url.parse('http://' + request.url);
var remoteSocket = net.connect(reqData.port, reqData.hostname,
function() {
clientSocket.write('HTTP/1.1 200 \r\n\r\n');
remoteSocket.write(head);
remoteSocket.pipe(clientSocket);
clientSocket.pipe(remoteSocket);
});
}).listen(8080);

var request = http.request({
port: 8080,
hostname: 'localhost',
method: 'CONNECT',
path: 'www.google.com:80'
});
request.end();
request.on('connect', function(res, socket, head) {
socket.setEncoding("utf8");
socket.write('GET / HTTP/1.1\r\nHost: www.google.com:80\r\nConnection: close\r\n\r\n');
socket.on('readable', function() {
console.log(socket.read());
});
socket.on('end', function() {
proxy.close();
});
});
[ 71 ]
Streaming Data Across Nodes and Clients
HTTPS, TLS (SSL), and securing your server
The security of web applications has become a significant discussion topic in recent years. Traditional applications normally benefited from the well-tested and mature security models designed into the major servers and application stacks underpinning major deployments. For one reason or another, web applications were allowed to venture into the experimental world of client-side business logic and open web services shielded by a diaphanous curtain.
As Node is regularly deployed as a web server, it is imperative that the community begins to accept responsibility for securing these servers. HTTPS is a secure transmission protocol—essentially encrypted HTTP formed by layering the HTTP protocol on top of the SSL/TLS protocol.
Creating a self-signed certificate for development
In order to support SSL connections a server will need a properly signed certificate. While developing, it is much easier to simply create a self-signed certificate, which will allow one to use Node's HTTPS module.
These are the steps needed to create a certificate for development. Note that this process does not create a real certificate and is not secure—it simply allows us to develop within a HTTPS environment. From a terminal:
openssl genrsa -out server-key.pem 2048
openssl req -new -key server-key.pem -out server-csr.pem
openssl x509 -req -in server-csr.pem -signkey server-key.pem -out server-cert.pem
These keys may now be used to develop HTTPS servers. The contents of these files need simply be passed along as options to a Node server:
var https = require('https'); var fs = require('fs');
https.createServer({ key: fs.readFileSync('server-key.pem'), cert: fs.readFileSync('server-cert.pem') }, function(req,res) { ... }).listen(443)
[ 72 ]
Chapter 3
Free low-assurance SSL certificates are available from http://www.startssl.com/ for cases where self-signed certificates are not ideal during development.
Installing a real SSL certificate
In order to move a secure application out of a development environment and into an Internet-exposed environment a real certificate will need to be purchased. The prices of these certificates has been dropping year by year, and it should be easy to find reasonably priced providers of certificates with a high-enough level of security. Some providers even offer free person-use certificates.
Setting up a professional cert simply requires changing the HTTPS options we introduced above. Different providers will have different processes and filenames. Typically you will need to download or otherwise receive from your provider a private .key file, your signed domain certificate .crt file, and a bundle describing certificate chains:
var options = { key : fs.readFileSync("mysite.key"), cert : fs.readFileSync("mysite.com.crt"), ca : [ fs.readFileSync("gd_bundle.crt") ] };
It is important to note that the ca parameter must be sent as an array, even if the bundle of certificates has been concatenated into one file.
The request object
HTTP request and response messages are similar, consisting of:
-
A status line, which for a request would resemble GET/index.html HTTP/1.1, and for a response would resemble HTTP/1.1 200 OK
-
Zero or more headers, which in a request might include Accept-Charset: UTF-8 or From: user@server.com, and in responses might resemble Content-Type: text/html and Content-Length: 1024
-
A message body, which for a response might be an HTML page, and for a POST request might be some form data
We've seen how HTTP server interfaces in Node are expected to expose a request handler, and how this handler will be passed some form of a request and response object, each of which implement a readable or writable stream.
[ 73 ]
Streaming Data Across Nodes and Clients
We will cover the handling of POST data and Header data in more depth later in this chapter. Before we do, let's go over how to parse out some of the more straightforward information contained in a request.
The URL module
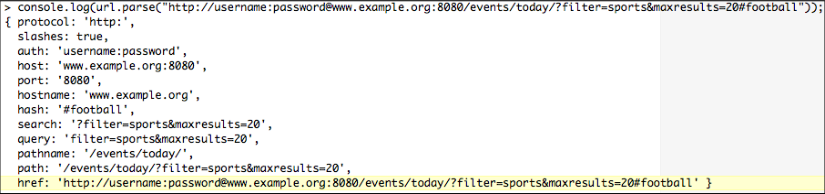
Whenever a request is made to an HTTP server the request object will contain url property, identifying the targeted resource. This is accessible via request.url. Node's URL module is used to decompose a typical URL string into its constituent parts. Consider the following figure:
We see how the url.parse method decomposes strings, and the meaning of each segment should be clear. It might also be clear that the query field would be more useful if it was itself parsed into Key/Value pairs. This is accomplished by passing true as the second argument of to the parse method, which would change the query field value given above into a more useful key/value map:
query: { filter: 'sports', maxresults: '20' }
This is especially useful when parsing GET requests.
There is one final argument for url.parse that relates to the difference between these two URLs:
The second URL here is an example of a (relatively unknown) design feature of the HTTP protocol: the protocol-relative URL (technically, a network-path reference ), as opposed to the more common absolute URL.
[ 74 ]
 Chapter 3
To learn more about how network-path references are used to smooth resource protocol resolution visit the following link:
http://tools.ietf.org/html/rfc3986#section-4.2
The issue under discussion is this: url.parse will treat a string beginning with slashes as indicating a path, not a host. For example, url.parse("//www.example.org") will set the following values in the host and path fields:
host: null,
path: '//www.example.org'
What we actually want is the reverse:
host: 'www.example.org',
path: null
To resolve this issue, pass true as the third argument to url.parse, which indicates to the method that slashes denote a host, not a path:
url.parse("//www.example.org",null,true)
It is also the case that a developer will want to create a URL, such as when making requests via http.request. The segments of said URL may be spread across various data structures and variables, and will need to be assembled. One accomplishes this by passing an object like the one returned from url.parse to the method url. format.
The following code will create the URL string http://www.example.org:
url.format({ protocol: 'http:', host: 'www.example.org' })
Similarly, one may also use the url.resolve method to generate URL strings in the common scenario of requiring the concatenating a base URL and a path:
url.resolve("http://example.org/a/b", "c/d") // 'http://example.org/a/c/d' url.resolve("http://example.org/a/b", "/c/d") // 'http://example.org/c/d' url.resolve("http://example.org", "http://google.com") // 'http://google.com/'
[ 75 ]
Streaming Data Across Nodes and Clients
The Querystring module
As we saw with the URL module, query strings often need to be parsed into a map of key/value pairs. The Querystring module will either decompose an existing query string into its parts, or assemble a query string from a map of key/value pairs.
For example, querystring.parse("foo=bar&bingo=bango") will return:
{ foo: 'bar', bingo: 'bango' }
If our query strings are not formatted using the normal "&" separator and "=" assignment character, the Querystring module offers customizable parsing. The second argument to Querystring can be a custom separator string, and the third a custom assignment string. For example, the following will return the same mapping as given previously on a query string with custom formatting:
var qs = require("querystring"); console.log(qs.parse("foo:bar^bingo:bango", "^", ":")) // { foo: 'bar', bingo: 'bango' }
One can compose a query string using the Querystring.stringify method:
console.log(qs.stringify({ foo: 'bar', bingo: 'bango' })) // foo=bar&bingo=bango
As with parse, stringify also accepts custom separator and assignment arguments:
console.log(qs.stringify({ foo: 'bar', bingo: 'bango' }, "^", ":")) // foo:bar^bingo:bango
Query strings are commonly associated with GET requests, seen following the ? character. As we've seen above, in these cases automatic parsing of these strings using the url module is the most straightforward solution. However, strings formatted in such a manner also show up when we're handling POST data, and in these cases the Querystring module is of real use. We'll discuss this usage shortly. But first, something about HTTP headers.
[ 76 ]
Chapter 3
Working with headers
Each HTTP request made to a Node server will likely contain useful header information, and clients normally expect to receive similar package information from a server. Node provides straightforward interfaces for reading and writing headers. We'll briefly go over those simple interfaces, clarifying some details. Finally, we'll discuss how to more advanced header usage might be implemented in Node, studying some common network responsibilities a Node server will likely need to accommodate.
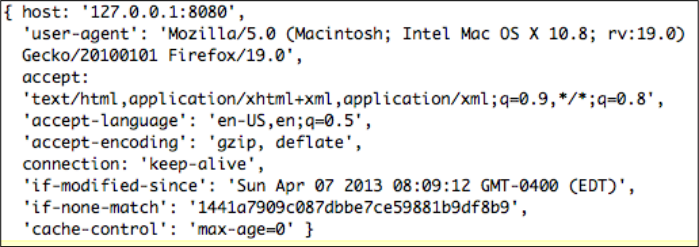
A typical request header will look something like the following:
Headers are simple Key/Value pairs. Request keys are always lowercased. You may use any case format when setting response keys.
Reading headers is straightforward. Read header information by examining the request.header object, which is a 1:1 mapping of the header's Key/Value pairs. To fetch the "accept" header from the previous example, simply read request. headers.accept.
The number of incoming headers can be limited by setting the maxHeadersCount property of your HTTP server.
If it is preferred that headers are read programmatically, Node provides the response.getHeader method, accepting the header key as its first argument.
[ 77 ]
 Streaming Data Across Nodes and Clients
While request headers are simple Key/Value pairs, when writing headers we need a more expressive interface. As a response typically must send a status code, Node provides a straightforward way to prepare a response status line and header group in one command:
response.writeHead(200, { 'Content-Length': 4096, 'Content-Type': 'text/plain' });
To set headers individually, one can use response.setHeader, passing two arguments: the header key, followed by the header value.
To set multiple headers with the same name, one may pass an array to response. setHeader:
response.setHeader("Set-Cookie", ["session:12345", "language=en"]);
Occasionally it may be necessary to remove a response header after that header has been "queued". This is accomplished by using response.removeHeader, passing the header name to be removed as an argument.
Headers must be written prior to writing a response. It is an error to write a header after a response has been sent.
Using cookies
The HTTP protocol is stateless. Any given request has no information on previous requests. For a server this meant that determining if two requests originated from the same browser was not possible. Cookies were invented to solve this problem. Cookies are primarily used to share state between clients (usually a browser) and a server, existing as small text files stored in browsers.
Cookies are insecure. Cookie information flows between a server and a client in plain text. There is any number of tamper points in between. Browsers allow easy access to them, for example. This is a good idea, as nobody wants information on their browser or local machine to be hidden from them, beyond their control.
Nevertheless, cookies are also used rather extensively to maintain state information, or pointers to state information, particularly in the case of user sessions or other authentication scenarios.
[ 78 ]
Chapter 3
It is assumed that you are familiar with how cookies function in general. Here we will discuss how cookies are fetched, parsed, and set by a Node HTTP server. We will use the example of a server that echoes back the value of a sent cookie. If no cookie exists, the server will create that cookie and instruct the client to ask for it again.
First we create a server that checks request headers for cookies:
var http = require('http'); var url = require('url'); var server = http.createServer(function(request, response) { var cookies = request.headers.cookie;
Note that cookies are stored as the cookie attribute of request.headers. If no cookies exist for this domain, we will need to create one, giving it the name session and a value of 123456:
if(!cookies) { var cookieName = "session"; var cookieValue = "123456"; var expiryDate = new Date(); expiryDate.setDate(expiryDate.getDate() + 1); var cookieText = cookieName + '=' + cookieValue + ';expires='
- expiryDate.toUTCString() + ';'; response.setHeader('Set-Cookie', cookieText); response.writeHead(302, { 'Location': '/' });
return response.end(); }
If we have set this cookie for the first time, the client is instructed to make another request to this same server. As there is now a cookie set for this domain, the subsequent request will contain our cookie, which we handle next:
cookies.split(';').forEach(function(cookie) { var m = cookie.match(/(.?)=(.)$/); cookies[m[1].trim()] = (m[2] || '').trim(); }); response.end("Cookie set: " + cookies.toString());
}).listen(8080);
[ 79 ]
Streaming Data Across Nodes and Clients
Understanding content types
A client will often pass along a request header indicating the expected response MIME ( Multi-purpose Internet Mail Extension ) type. Clients will also indicate the MIME type of a request body. Servers will similarly provide header information about the MIME type of a response body. The MIME type for HTML is text/html, for example.
As we have seen, it is the responsibility of an HTTP response to set headers describing the entity it contains. Similarly, a GET request will normally indicate the resource type, the MIME type, it expects as a response. Such a request header might look like this:
Accept: text/html
It is the responsibility of a server receiving such instructions to prepare a body entity conforming to the sent MIME type, and if it is able to do so it should return a similar response header:
Content-Type: text/html; charset=utf-8
Because requests also identify the specific resource desired (such as /files/index. html), the server must ensure that the requested resource it is streaming back to the client is in fact of the correct MIME type. While it may seem obvious that a resource identified by the extension html is in fact of the MIME type text/html, this is not at all certain—a filesystem does nothing to prevent an image file from being given an "html" extension. Parsing extensions is an imperfect method of determining file type. We need to do more.
The UNIX file program is able to determine the MIME type of a system file. For example, one might determine the MIME type of a file without an extension (for example, resource) by running this command:
file --brief --mime resource
We pass arguments instructing file to output the MIME type of resource, and that the output should be brief (only the MIME type, and no other information).
This command might return something like text/plain; charset=us-ascii. Here we have a tool to solve our problem.
For more information about the file utility consult go to the following link:
http://unixhelp.ed.ac.uk/CGI/man-cgi?file
[ 80 ]
Chapter 3
Recalling that Node is able to spawn child processes, we have a solution to our problem of accurately determining the MIME type of system files.
We can use the Node command exec method of Node's child_process module in order to determine the MIME type of a file like so:
var exec = require('child_process').exec; exec("file --brief --mime resource", function(err, mime) { console.log(mime); });
This technique is also useful when validating a file streamed in from an external location. Following the axiom "never trust the client", it is always a good idea to check whether the Content-type header of a file posted to a Node server matches the actual MIME type of the received file as it exists on the local filesystem.
Handling favicon requests
When visiting a URL via a browser one will often notice a little icon in the browser tab or in the browser's address bar. This icon is an image, named favicon.ico and it is fetched on each request. As such, an HTTP GET request is normally combines two requests—one for the favicon, and another for the requested resource.
Node developers are often surprised by this doubled request. Any implementation of an HTTP server must deal with favicon requests. To do so, the server must check the request type, and handle it accordingly. The following example demonstrates one method of doing so:
var http = require('http'); http.createServer(function(request, response) { if(request.url === '/favicon.ico') { response.writeHead(200, { 'Content-Type': 'image/x-icon' }); return response.end(); } response.writeHead(200, { 'Content-Type': 'text/plain' }); response.write('Some requested resource'); response.end();
}).listen(8080);
This code will simply send an empty image stream for the favicon. If there is a favicon to send, one would simply push that data through the response stream, as we've discussed previously.
[ 81 ]
Streaming Data Across Nodes and Clients
Handling POST data
One of the most common REST methods used in network applications is POST. According to the REST specification a POST is not idempotent, as opposed to most of the other well-known methods (GET, PUT, DELETE, and so on) that are. This is mentioned in order to point out that the handling of POST data will very often have a consequential effect on an application's state, and should therefore be handled with care.
We will now discuss handling of the most common type of POST data, that which is submitted via forms. The more complex type of POST—multipart uploads—will be discussed in Chapter 4, Using Node to Access the Filesystem .
Let's create a server which will return a form to clients, and echo back any data that client submits with that form. We will need to first check the request URL, determining if this is a form request or a form submission, returning HTML for a form in the first case, and parsing submitted data in the second:
var http = require('http');
var qs = require('querystring');
http.createServer(function(request, response) {
var body = "";
if(request.url === "/") {
response.writeHead(200, {
"Content-Type": "text/html"
});
return response.end(
'<form action="/submit" method="post">
<input type="text" name="sometext">
<input type="submit" value="Upload">
</form>'
);
}
Note that the form we respond with has a single field named sometext. This form should POST data in the form sometext=entered_text:
if(request.url === "/submit") { request.on('readable', function() { body += request.read();
}); request.on('end', function() { var fields = qs.parse(body); response.end("Thanks!");
[ 82 ]
Chapter 3
console.log(fields) }); } }).listen(8080);
Once our POST stream ends and the client is notified that the POST is received, we parse the posted data using Querystring.parse, giving us a Key/Value map accessible via fields["somedata"].
Creating and streaming images with Node
Having gone over the main strategies for initiating and diverting streams of data, let's practice the theory by creating a service to stream (aptly named) PNG ( Portable Network Graphics ) images to a client. This will not be a simple file server, however. The goal is to create PNG data streams by piping the output stream of an ImageMagick convert operation executing in a separate process into the response stream of an HTTP connection, where the converter is translating another stream of SVG ( Scalable Vector Graphics ) data generated within a virtualized DOM ( Document Object Model ) existing in the Node runtime. Let's get started.
The full code for this example can be found in your code bundle.
Our goal is to use Node to generate pie charts dynamically on a server based on client requests. A client will specify some data values, and a PNG representing that data in a pie will be generated. We are going to use the D3.js library, which provides a Javascript API for creating data visualizations, and the jsdom NPM package, which allows us to create a virtual DOM within a Node process.
Additionally, the PNG we create will be written to a file. If future requests pass the same query arguments to our service, we will then be able to rapidly pipe the existing rendering immediately, without the overhead of regenerating it.
[ 83 ]
Streaming Data Across Nodes and Clients
A pie graph represents a range if percentages whose sum fills the total area of a circle, visualized as slices. Our service will draw such a graph based on the values a client sends. In our system the client is required to send values adding up to 1, such as .5, .3, .2. Our server, when it receives a request, will therefore need to fetch query parameters as well as create a unique key that maps to future requests with the same query parameters:
var values = url.parse(request.url, true).query['values']. split(","); var cacheKey = values.sort().join('');
Here we see the URL module in action, pulling out our data values. As well, we create a key on these values by first sorting the values, then joining them into a string we will use as the filename for our cached pie graph. We sort values for this reason: the same graph is achieved by sending .5 .3 .2 and .3 .5 .2. By sorting and joining these both become the filename .2 .3 .5.
In a production application, more work would need to be done to ensure that the query is well formed, is mathematically correct, and so on. In our example we assume proper values are being sent.
Creating, caching, and sending a PNG representation
Assuming we do not have a cached copy, we will need to create one. Our system works by creating a virtual DOM, using D3 to generate an SVG pie chart within that DOM, passing the generated SVG to the ImageMagick convert program, which converts SVG data into a PNG representation. Additionally, we will need to store the created PNG on a filesystem.
We use jsdom to create a DOM, and use D3 to create the pie chart. Visit https://github.com/tmpvar/jsdom to learn about how jsdom works, and http://d3js.org/ to learn about using D3 to generate SVG. Assume that we have created this SVG, and stored it in a variable svg, which will contain a string similar to this:
<svg width="200" height="200"> <g transform="translate(100,100)"> <defs> <radialgradient id="grad-0" gradientUnits="userSpaceOnUse" cx="0" cy="0" r="100"> <stop offset="0" stop-color="#7db9e8"></stop> ...
[ 84 ]
Chapter 3
We now must convert that SVG into a PNG. To do this we spawn a child process running the ImageMagick convert program, and stream our SVG data to the stdin of that process:
var svgToPng = spawn("convert", ["svg:", "png:-"]); svgToPng.stdin.write(svg); svgToPng.stdin.end();
The stdout of the svgToPng process (a ReadableStream) will push a byte stream representing the PNG of our pie graph. This stream will be piped to two WritableStreams: the response object, such that our client receives the PNG data, and a new PNG file, which filename will be stored in the variable cacheKey. A response stream already exists; we must now create the file stream:
var filewriter = fs.createWriteStream(cacheKey); filewriter.on("open", function(err) { ...
Once we have successfully opened a file stream we have all our streams in place: a ReadableStream represented by the stdout of the convert process; a WritableStream bound to a file on our filesystem; and the WritableStream represented by our server's response object. We must now achieve this flow: PNG conversion stream > file stream > response stream:
svgToPng.stdout.pipe(file).pipe(response);
This will not work as is, however: a WritableStream (file) cannot be piped to another WritableStream (response), as such a stream does not push data. One way to solve this is to use a TransformStream:
var streamer = new stream.Transform(); streamer._transform = function(data, enc, cb) { filewriter.write(data); this.push(data); cb(); }; svgToPng.stdout.pipe(streamer).pipe(response);
Recalling our discussion on streams, what is happening here should be clear. A TransformStream functions as a DuplexStream, being both readable and writable. We override its abstract _transform method, and do our file writing there. Once we successfully write to a file, we then push the same data forward onto the response stream. We can now achieve the desired stream chaining:
svgToPng.stdout.pipe(streamer).pipe(response);
[ 85 ]
Streaming Data Across Nodes and Clients
And the client receives a pie graph:
Finally, we need to handle cases where the requested pie chart has already been rendered and can be directly streamed from a filesystem:
fs.exists(cacheKey, function(exists) { response.writeHead(200, { 'Content-Type': 'image/png' });
if(exists) { fs.createReadStream(cacheKey) .on('readable', function() { var chunk; while(chunk = this.read()) { response.write(chunk); } }) .on('end', function() { response.end(); });
return; } ...
Once we have determined that a cached file exists, we run a while loop pulling data off the file stream, writing this data to a response object, until the file stream ends.
[ 86 ]
 Chapter 3
Summary
As we have learned, Node's designers have succeeded in creating a simple, predictable, and convenient solution to the very difficult problem of enabling efficient I/O between disparate sources and targets. Its abstract Stream interface facilitates the instantiation of consistent readable and writable interfaces, and the extension of this interface into HTTP requests and responses, the filesystem, child processes, and other data channels makes stream programming with Node a pleasant experience.
Now that we've learned how to set up HTTP servers to handle streams of data arriving from many simultaneously connected clients, and how to feed those clients buffets of buffered streams, we can begin to engage more deeply with the task of building enterprise-grade concurrent real-time systems with Node.
[ 87 ]
Made by Anh Tu - Share to be share